From the pad to Mars
The shape of a whole space programme, in the order it is meant to be flown: what to buy, what to fly it with, and what each stretch of the game pays you for. The other guides teach one flight each — this one is the map they sit on.
What this guide is
You have a rocket, 5,000 credits and a board full of jobs, and nothing tells you which of them matters. This page walks the whole arc from your first launch to standing on Mars, one act at a time. Each act says what you should be flying, what to spend on before you fly it, and roughly how many launches it takes.
It does not repeat the flying. When an act says put a ship in orbit, the steps for that are in Reaching orbit; when it says land on the Moon, they are in Landing on the Moon. Read this one for the order, those for the stick.
The one rule that shapes everything
There are two currencies and they are not interchangeable. Credits buy attempts — every time a first stage lights you pay the ship's price, and every ship you bring home pays it back. Discovery buys permission — tech nodes and Research Centre levels, once each, forever. Credits and discovery explains both.
What that means in practice, and it is the single most useful thing on this page:
- Credits pile up. Fly the board, recover your ships, and by the Moon you will have more money than you can spend. Money is almost never what stops you.
- Discovery does not. Almost all of it is paid once, the first time you do something — a first orbit, a first landing, a reading nobody has taken. There is no way to buy it and only a thin trickle to grind for it.
So the whole game is really one question: what have I not done yet? Spend credits freely and treat every first as money in the bank.
The shape of a programme
| Act | What you fly | What it opens | Launches |
|---|---|---|---|
| 1 · The pad | The starter rocket | The whole of tier 1 | 10–15 |
| 2 · Orbit | A two-stage rocket | Launch Pad 2, Research Centre 2 | 10–15 |
| 3 · The network | Unmanned relays | Radio, power, the Administration | 8–12 |
| 4 · The Moon | A three-stage lander | Launch Pad 3, Research Centre 3 | 10–15 |
| 5 · Mars | A four-stage lander | Launch Pad 4, Research Centre 4 | 8–12 |
| 6 · Further out | Long-range probes | Everything left | 10+ |
Call it sixty flights if everything works and ninety if it does not, and it will not. Expect to lose roughly one ship in three while you are learning a new act. That is normal and the game is priced for it.
Act 1 · The pad
You start with 5,000 credits, 100 gems, no discovery, and one astronaut who cost nothing — your programme's founder, already on the roster. The Launch Pad takes 12 t and 20 m; the Research Centre opens tier 1 only; the Administration hands out three jobs at a time.
The rocket in the hangar when you first open it is all you need. It is 880 cr and carries 3,230 m/s — three times what a hop over the atmosphere takes.
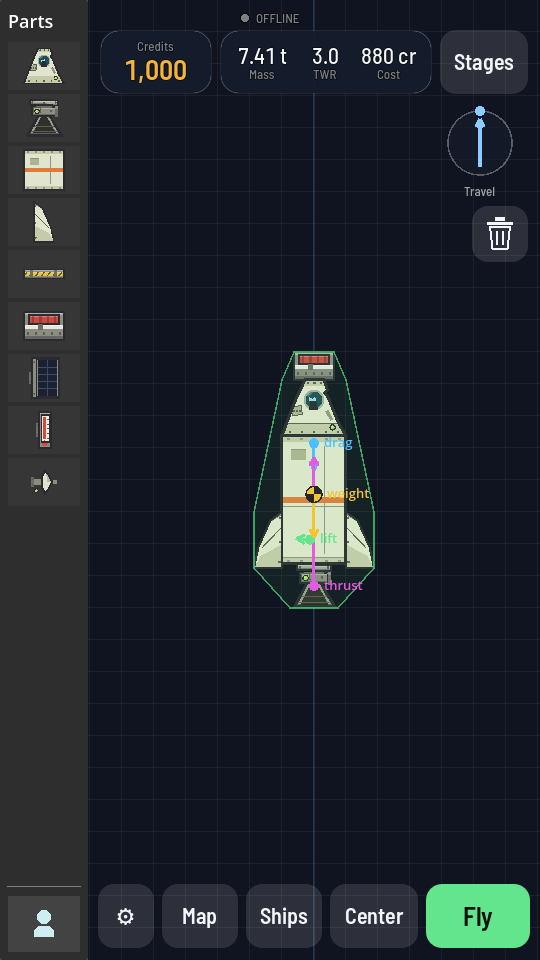
Take work before you launch, not after
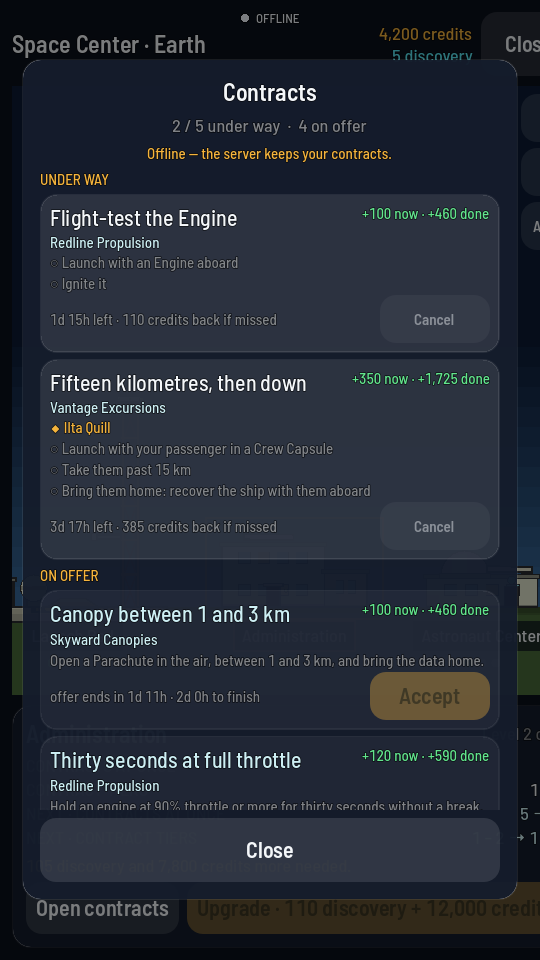
This is the habit that pays best in the whole game, and almost nobody does it on their first flight. Contracts are judged only on a flight that left the pad after you signed, so a job accepted while your rocket is already in the air pays nothing.
- Open the space center and then the Administration. Tap the Space Center button (the dome) in the hangar, tap the Administration building, then its action button. See Running a contract for the board itself.
- Take three jobs that one flight can satisfy. At tier 1 most of them are part tests — fly with an engine and light it, carry a pod past 15 km, fins above 5 km. All three are true of a single vertical shot. Tap Accept on each; you are paid an advance immediately.
- Then fly. Back to the hangar, Fly, STAGE. Every goal ticks on the one flight.
What to fly
- A short hop first. Throttle around 40%, up to 12 km, open the parachute low, land, and use RECOVER from the flight menu. See Your first flight and Recover a landed ship.
- Then the same rocket, straight up, full throttle. It will pass 50 km, leave the atmosphere entirely and come back down. That single flight collects the sound barrier, 10 km, 50 km, space, 1 km/s, Mach 3, a 150 km apoapsis, 250 km and your first high-g load.
- Then land somewhere interesting. Lean the rocket over on the way up and put it down on a hill, on a slope, above the snowline. Each of those is its own first and pays like one.
What to buy
| Buy | Price | Why now |
|---|---|---|
| Instruments | 15 discovery | A Thermometer, and with it the repeatable research jobs |
| Staging | 18 discovery | The Separator — nothing reaches orbit without it |
| Aerodynamics | 12 discovery | A nose cone, and the way to Recovery later |
| Solid Boosters, Structures, Logistics, Wings | 86 discovery | Cheap, and each carries its own firsts to claim |
| Launch Pad level 2 | 4,000 credits | Needs Staging. 50 t and 40 m |
| Research Centre level 2 | 200 discovery + 2,500 credits | Opens tier 2. Nothing in tier 2 is buyable until this is |
Buy a tech node and Upgrade a building have the steps.
Act 2 · Orbit
A single stage cannot reach orbit, and that is deliberate. The rocket that can is two stages: a long tank on two Engines with fins and a Separator, carrying the starter rocket on top as its upper stage. 1,650 cr, 38.4 m tall — which is why the pad had to go up first.
| As far as | Δv from the pad | The two-stage rocket carries |
|---|---|---|
| Out of the air and back | 1,087 m/s | 5,635 m/s |
| A stable orbit of Earth | 3,104 m/s | |
| An orbit of the Moon | 4,272 m/s |
That last row is worth reading twice. The rocket you built to reach orbit has enough left in it to leave Earth's sphere and go and look at the Moon — it just cannot land there or come back. Once you can circularise reliably, spend a flight on it: leaving Earth, entering the Moon's sphere and orbiting another world are three separate firsts, and they pay far better than another lap of Earth.
- Reach orbit and come home. Reaching orbit, then Coming home from orbit. Do it with an astronaut aboard — a crewed orbit and a crewed return each pay separately from the flight itself.
- Leave something up there. One Programme mission wants a ship of yours still in orbit a day later. Fly a stripped-down upper stage, put it in a high orbit and walk away.
- Then climb out of Earth's sphere. Burn at apoapsis until the map shows your path leaving Earth. You get back into the atmosphere the same way you came.
Act 3 · The network
This is the act that surprises people, so it is worth saying plainly: relays cost money and never give it back. A satellite has no parachute and never lands, so there is nothing to recover. Budget for it.
A relay is a Sat Controller, a CR-1 Relay Whip, a couple of SP-1 Solar Panels and a PB-20 Battery on a small stage — around 1,680 cr each, launched on the same two-stage booster. The Programme asks for six of them in Earth orbit before it is finished with you.
A probe network is the guide for building and placing them. The tech you need is Probe Control, Solar Power, Batteries and Radio Comms — 148 discovery between them, all tier 2.
- Fly one probe by radio first. A Sat Controller in place of the pod means no astronaut and nothing to bring home, and it must hold a link to the ground to answer its controls at all.
- Spread three round Earth, then three more. Different orbits, not the same one — the point is that one of them can always see you.
- Leave them powered. Two missions ask you to hold a working network for seven days, and a relay whose battery dies in the planet's shadow stops counting. Panels and a battery, on every one.
Buy the Astronaut Center's second level before your next reading
This is the one purchase in the game where spending credits gets you discovery, and the order matters.
The Astronaut Center's second level (3,000 credits + 35 discovery) is what lets you hire a Scientist. A Scientist aboard raises what a reading achievement pays — both its credits and its discovery, by a tenth for each point of their science rating, up to double. It does not change what a new place is worth; that pays the same whoever is flying. Readings and the survey keeps the two apart.
See Recruiting the Meek, Readings and the survey and Take a reading.
Act 4 · The Moon
The Moon is where the game stops being generous, and it is worth knowing why before you get there. Everything up to here you could pay for out of what the last act earned. From here the Research Centre starts asking for more discovery than any single act pays, so you will be picking which nodes you want rather than buying all of them.
| Buy before the Moon | Price |
|---|---|
| Vacuum Engines | 55 discovery |
| Landing Gear | 50 discovery |
| Barometry, then Payload Bay | 80 discovery |
| Launch Pad level 3 | 15,000 credits |
| Research Centre level 3 | 450 discovery + 6,000 credits |
The Moon pays better than anything before it: the sphere, the orbit, the landing, the crater, the surface reading, bringing a Meek home again, and eight points of interest scattered across it. Fly it more than once and land somewhere different each time.
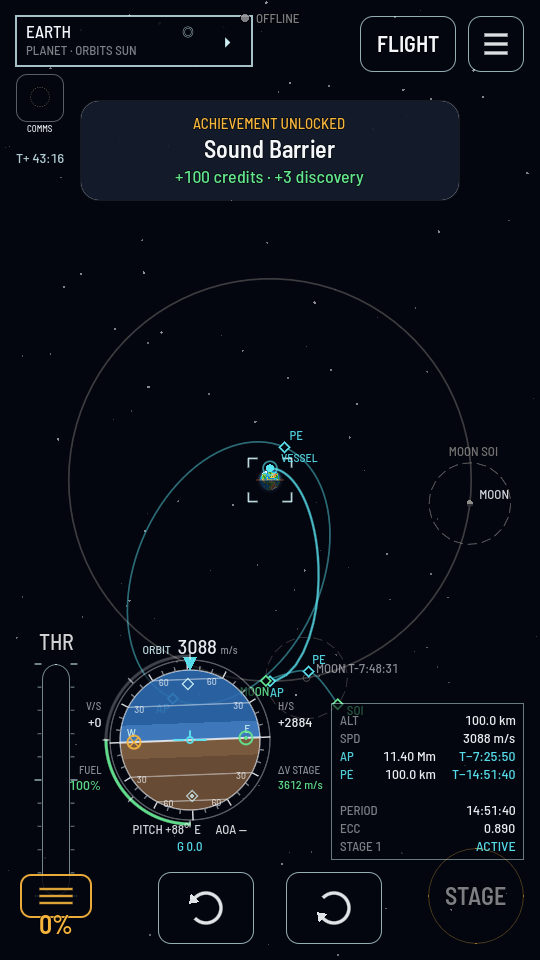
Then do the lunar network: three relays round the Moon, held powered for a week, so the far side stops being dark. It is the same job as Act 3 with a longer trip, and the hardware is the same.
Act 5 · Mars
Mars needs one thing that nothing else in the game needs: Launch Pad level 4, at 40,000 credits. It is the largest single purchase you will make and the only building level that asks for no tech at all — just money. This is what the credits have been piling up for.
| As far as | Δv from the pad |
|---|---|
| Orbit of Mars | 4,811 m/s |
| Standing on Mars | 6,048 m/s |
Mars' air is thin enough to be a trap: there is enough of it to burn a ship on the way in, and not nearly enough for a parachute to land one. You need a Heat Shield above and engines below, and you need to have practised the reentry at Earth first.
Take a Thermometer, a Barometer and a Mass Spectrometer, and a Scientist to read them. The Mars readings are the best-paying set in the game: the pressure, the cold and the carbon dioxide each pay on their own.
Act 6 · Further out
Past Mars the ladder stops getting steeper. Pluto's orbit is 6,716 m/s from the pad — barely more than landing on Mars — and a Mars-class rocket carries far more than that. What the outer system costs is not fuel, it is time: a transfer out there is weeks on the world clock.
So the last act is flown differently. Launch a probe, plan its transfer, set a reminder for the encounter and put the phone down. See Set a reminder and The shared world and its clock.
It is also where the discovery is. Every world has places nobody has measured, and the further from Earth a place is the more its first reading pays — up to seven times what the same reading is worth on Earth. A probe with all three instruments, parked somewhere nobody has been, is the best discovery in the game.
Habits that pay for themselves
- Sign the jobs before you launch, every time. A flight that satisfies three contracts and a Programme mission at once is worth four flights that each satisfy one.
- Recover everything that lands. A ship brought home refunds every part still on it, at the price you paid. A hop you land and recover is free.
- Do a thing you have not done before, rather than a thing you are good at. Almost all discovery is paid on the first time. The tenth orbit pays nothing the first one did not.
- Carry the instruments even when the flight is not about them. A Thermometer is 35 cr and weighs almost nothing, and it turns every trip into a reading you have not taken. All three together are 150 cr and 40 kg, and each one surveys a place the others already paid for.
- Buy the Scientist before the readings, not after. See Act 3.
- Skip a Programme mission you do not want. It costs nothing and everything behind it opens anyway: Skip a Programme mission.
When discovery runs short
It will, somewhere around the Moon. When a tech card says you cannot afford it, tap it anyway — the card opens a sheet that names where the discovery you are missing can still be earned. Find more discovery covers it, and the short version is:
- Research jobs on the contract board pay discovery rather than only credits, and unlike most jobs they come back again and again.
- Readings in places you have not read — a different world, a different height, the ground rather than the air.
- Points of interest, each paid once, found by landing inside them, or shown to you by their own survey jobs once you have landed on that world.
- Firsts you have walked past — the achievements list shows what you have and roughly what is left.