Rendezvous and docking
Two of your ships in the same orbit can be brought together and joined into one. Getting there is orbital mechanics; the last hundred metres is station-keeping; the joint itself is four conditions the latches — or a claw's jaws — will or will not accept.
Marking a target
Any ship of yours already in the world can be made the target of the one you are flying. On the flight's map, tap that ship to bring up its card, and the card carries a TARGET button. Once it is picked the button reads UNTARGET, and your own card grows three rows about it: RANGE, the gap right now; REL SPEED, how fast the two of you are moving apart or together; and CLOSEST, the nearest your path comes to it and how fast you will be going past when it happens.
Targeting is a flight thing. The button is only on the card while you are flying, because a target is something a ship is steered towards.
Where you will pass it
Marking a target puts closest-approach markers on your forecast, drawn in the same lavender the target is. They cover one lap of your orbit and no further: the nearest is titled CLOSEST and the one after it 2ND PASS. If the gap only ever closes over that lap, there is no nearest point in it to mark, and the single marker at the end of the lap is titled IN 1 ORBIT instead. As you fly past one, the search rolls on to the next lap, so the markers keep moving ahead of you.
Those markers are ordinary map markers. Tap one and the callout gives the distance, the time and the relative speed; you can set a reminder on it like any other.
A planned maneuver node is searched the same way, so the passes redraw as you drag the node's handles. That is how a rendezvous is actually set up: plan a burn, watch the CLOSEST figure fall, and stop when it is a few kilometres. See The map and maneuver nodes.
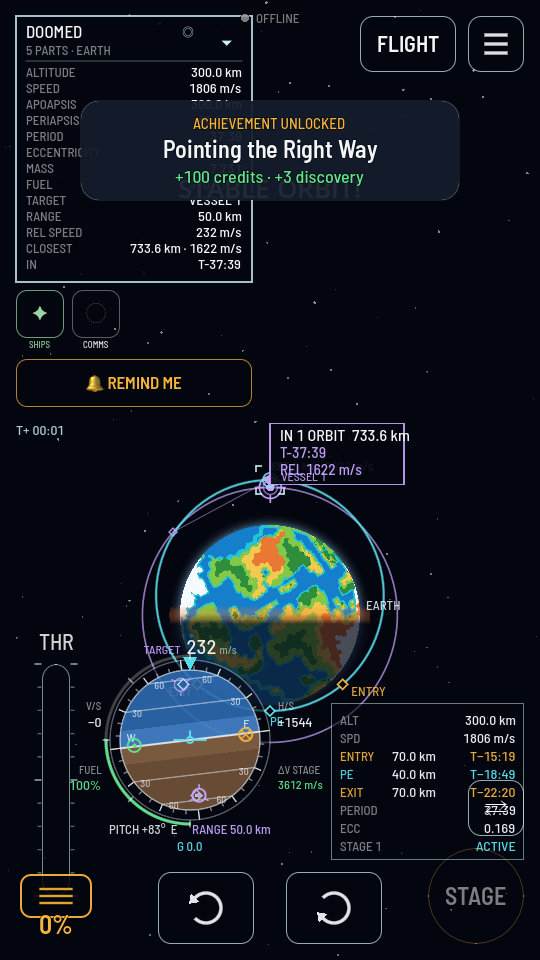
The navball in TARGET mode
While a target is set, the navball marks where it lies with a lavender ◉ in every mode, and puts a hollow mark directly opposite it. Point at the ◉ and burn and you close the gap; point at its opposite and burn and you open it.
Tapping the ball cycles the speed it reads: ORBIT, then SURFACE, then TARGET. In TARGET mode every speed on the instrument is measured against the target rather than the planet, the ⊙ and ⊗ marks become the direction you are drifting towards it and away from it, and the line under the ball reads RANGE. Burning at ⊗ in that mode is what kills the relative speed, which is the whole of a rendezvous: get the range small, then get the relative speed to nothing.
The last twenty kilometres
Inside 20 km the map stops being the instrument and a chip appears at the top left of the flight screen. It names the target, gives the range, gives the relative speed, and says in words whether the gap is CLOSING, OPENING or HOLDING. An arrow on the chip points where the target is on screen, and it turns as you steer. The chip turns from cyan to amber once the target is close enough to be drawn in the world beside you.
A second chip, red and marked with two exclamation marks, appears above it whenever another player's ship is on a collision course with yours: it names the ship, says how long until the two meet and how close the pass will be, and pulses until the danger is gone. It shows only for a ship that is solid to you — a ghost passes through and raises no alarm — never for the ship you have targeted or are docked to, and not for a pass slower than 3 m/s, which is a docking approach. It uses the same distance and look-ahead the world uses to decide who is at fault when ships collide (below), so if the chip is up, one of you has set a course that ends in a hit. Burn away and it clears.
Your other ships are really there
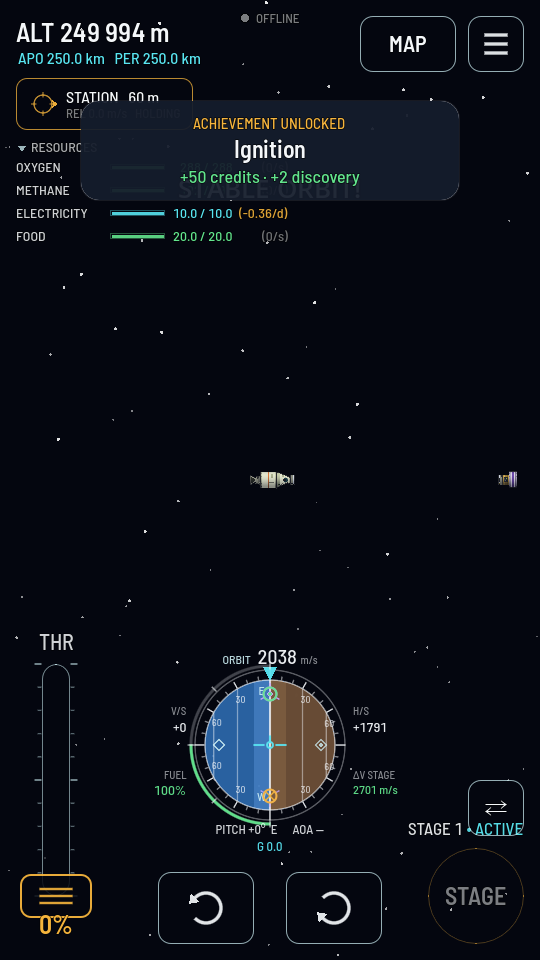
Within a few kilometres, every ship of yours in this part of space is brought into the flight properly. It is drawn where it is, its own parts keep working, and it is solid. You can nudge it, and you can ram it, with the same consequences as any other collision: both ships take the blow where their parts met, and each part that was hit is judged on its own (Debris and dropped stages explains how). An open solar panel on a station breaks at a touch, so come in slowly. A ship of yours standing on the ground nearby is there too, parked where you left it: a gentle touch leaves it standing, a hard shove moves it. Lower your docking port gently onto its port and the two dock, as they would in orbit. The exceptions are a ship left on the launch pad and another player's ship standing on the ground: neither is brought into a flight.
A ship drawn beside you can also be tapped. Tapping any part of it opens a sheet named after the ship with two buttons on it. Set as target marks it as your target without a trip to the map, which matters when two ships are so close that the map draws them as one dot; on the ship that already is the target the button reads Clear target. Take control swaps the two ships on the spot: you are now flying the one you tapped, with its own throttle, staging, crew and planned burns, and the ship you were in is left coasting where it was, waiting for you to tap your way back. Either ship may be the target of the other, and a ship cannot be its own target, so taking control of the target clears it. A piece with no command part aboard cannot be flown, and its sheet says so.
Other players' ships
The world is shared, and so is its sky — but you only see it once your Comm Station is at level 2. Until then your map shows your own ships and nobody else's, whatever the SHIPS chip says (a ship you have targeted from the flight screen stays drawn). The one exception is the ship a player contract you hold sends you to: it is on your map at every level, and the SHIPS chip filters it like any other ship. From level 2, another player's ship shows on your map in amber while it is coasting on its orbit with nobody flying it, labelled with its name and a short tag for the program it belongs to (P-7F3A, never a person's name). You can follow it, mark it as your target and plan a rendezvous with it exactly as you would one of your own. A ship somebody is flying right now is shown too, as a ghost until you come close enough to share its flight. Ships on the ground never are. A derelict station or ship nobody can fly is still on your map from afar when its owner left it open, shown with debris (the map's +DEBRIS, or as your target). Other debris of another player's — a spent stage, a derelict not left open — is never on your map from afar, but it appears beside you once the ship you fly comes within about 12 km of it. There is no CONTROL for a ship that is not yours: the map offers VIEW and TARGET and nothing else.
Come within a few kilometres and it is drawn beside you like any ship. What happens when you reach it is its owner's decision:
| The ship is | To you it is |
|---|---|
| not open (the default) | Unlisted: not on other players' maps until they come within about ten kilometres of it, and then a ghost. It is where it is drawn, faded to show it is out of reach, and nothing touches it: your ship passes through it and it cannot be hit, grabbed or docked with. |
| OPEN | Solid, as one of your own would be — provided your ship carries insurance cover. You can dock with it port to port (a claw never takes hold of another player's ship), you can nudge it and you can ram it, and both ships really take the blow: parts break on both, its orbit really changes, and what is left of it still belongs to its owner. The label on the map ends in OPEN. |
| cloaked | Not there at all. A cloaked ship is never shown to you, on the map or beside you, however close you fly; you cannot target it, touch it or dock with it, and it never touches you. Its owner paid gems for that, once and for good (Cloak a ship). |
| wreckage | Solid to everybody, cover or not: a stranger's stage or wreck that nothing commands and nobody insures. Once it lies on Earth's ground within reach of a ship of yours that you recover, it comes home too: its owner is paid its price while your pilot rating goes up (salvage). |
You open a ship of yours from any command part's sheet: Open to other players, in the hangar or in flight, beside Control from here and Space station. Leave it off and nobody can so much as scratch it. Turn it on for a station you want visitors at, and know what you are agreeing to: a careless visitor can break it, and a cheap probe at crossing speed destroys both ships. In flight the switch first shows what its cover costs, and turning it on buys that cover: an open ship is always insured. A ship opened in the hangar is not open to anyone until its cover is bought in flight.
One ship opens without its switch: a ship of yours that a docking contract asks for, or that a passenger contract names as where a passenger waits or goes. For as long as the contract stands it is open to other players, so the pilot who takes it can come alongside; a docking's cover for that time was paid when you posted it, a passenger's ships keep yours. Other players see it marked CONTRACT on their maps rather than with your tag. When the contract ends, your own switch decides again.
While you fly beside an OPEN ship the status chip reads ROOM: the world itself is following the meeting move for move, and it, not your phone, decides what became of the other player's ship. For a moment after a blow the other ship may settle a hair from where you saw it go; that is the world's answer arriving. If the line to the world is down, every other player's ship is a ghost until it is back — and so is every open ship while your own carries no cover.
Insurance cover, claims and pilot rating
Any ship that touches another player's ship carries cover, on both sides: the OPEN ship needs it to be open at all, and the ship that comes to it needs it too, open or not. Without cover, every other player's ship is a ghost to you, exactly as if it were closed. Cover is a policy on one ship, switched on from a command part's sheet in flight (Insurance cover, beside Open to other players; the Open switch turns it on as well), or paid for a docking contract's whole life when you post one on the ship, which leaves the switch as it was and simply runs out afterwards. It is paid in advance for 24 hours at a time, and runs until the next full hour plus those 24: switched on at 15:30, your ship is insured until 16:00 tomorrow. While the switch stays on, the world renews it at that hour and takes the next premium from your credits — priced again from where the ship is at that moment, so a ship that has moved to another world pays that world's price from the next renewal on, whether that is more or less; the hours already paid are never re-priced. Turn the switch off and the hours already paid run out, then it ends. Nothing is refunded. A renewal your credits cannot pay ends that one ship's cover alone and, if the ship was open, closes it — your other ships keep theirs until their own hour, and renew as usual if you have earned credits by then. Cover needs the First dock achievement: dock two ships of your own before you visit anybody.
The premium is a share of what the ship is worth where it is — its parts and stored resources at catalog price, more the farther from Earth it orbits — times a multiplier set by your pilot rating. Rating runs from 0 to 1,000 and starts at 500. It falls only when a flight of yours breaks a part of another player's ship: a little for a docking port, a lot for a whole ship. A spent stage you leave drifting counts as your flight too — a tank of yours that hits somebody's station is your ram, not nobody's — while the pieces a collision knocks off a ship are nobody's fault. Who is at fault is decided when the course is set, not when the ships meet: at the end of every burn the world looks ahead, and if your new orbit brings you within the collision distance of another player's ship, the course is yours — whether you then fly the hit yourself, or close the app and let it happen hours later in the other pilot's flight. The pilot at fault takes the rating fall, and their ship is not rebuilt: the parts they lose in the hit are the price. Only the ship that was hit comes back. A pilot already being intercepted does not become the one at fault by a burn that leaves the pass as it was; a burn that makes the pass materially closer takes the course over, and leaving the course clears it. A player contract moves it too: a miss costs 50, a delivery earns 10. Your rating rises by a small step for each clean visit (docked to another player's ship, then let go with nothing of theirs broken), by another for each wreck you salvage, and it drifts slowly back toward 500 each day while under it. Your own rating, its band and how many of your ships hold cover are under Account in Settings (Your account). Every hundred points lost doubles the premium, and under 250 no cover can be had at all: every policy you hold ends, your open ships close, and every other player's ship is a ghost to you until your rating climbs back — by the daily drift, or faster by salvage, which needs no cover.
When another player's flight breaks a part of a covered ship of yours, the insurer puts it back. Nobody pays: the ship comes back as it stood, the parts that survived keep whatever state they are in and the lost ones return with the fuel they held, about an hour later around Earth, three around the Moon, a day around Mars. Fragments the collision made are taken back in. The rebuild waits until nobody is flying the ship. Crew are not insured: a Meek lost that way stays on the memorial, but their loss is not held against your company's reputation with the Meek, and the insurer pays one free hire of the same trade for each. Ships docked to a station that closes stay docked until their own port lets go.
Docking with another player's ship
An OPEN ship latches like any other: the same ports, the same five conditions — judged by the world rather than by your screen alone, so the rings close a moment after they meet, once the world has seen them meet. What is different is what the pair is afterwards. Two players' ships are never merged into one. They are joined: held rigidly together, ring to ring, as one body — and they stay two ships. Yours is still yours, with its name, its crew, its tanks and its place on your map; theirs is still theirs. Nothing changes hands.
| While you are joined | What holds |
|---|---|
| Flying | You fly your own ship and only your own ship: your engines, your thrusters, your reaction wheels answer you, and theirs answer them. But the two are one body, so whatever either of you does moves both: light your engine and the whole station goes with you, heavier and slower than you were alone. |
| Their parts | They are not part of your ship. Tapping one opens their ship's sheet, as it did before you docked; nothing aboard it is yours to switch, stage or rename, and no crew crosses the joint. What they do to their own ship — a panel stowed, a stage fired, their ring undocked — happens on your screen too, as the world hears of it. |
| Fuel and power | Nothing flows across the joint on its own. If the other player has turned on Share resources with other players on a command part of their ship (beside Open to other players), any store of yours offers Transfer resources with their tanks, batteries and larders on its list for every resource they have priced, and a load can be pumped the way they priced it through the joined rings — only what those rings carry (every resource through a docking port; charge, food and waste through anything). The world does the pumping: your phone asks, and both ships' figures change when it answers. Leave the switch off and your tanks are yours alone. |
| Prices | A sharing owner may put a price on any resource, both ways: what you pay for each unit you take out, and what they pay you for each unit you pump in. The transfer sheet shows the price, the 5% fee you pay on top as the one asking, and the total, before you commit; a resource they have not priced cannot cross between you at all, since nothing passes between two players for free. See Buy from or sell to another player's station and Put prices on your station. |
| Both of you aboard | The other player can take the controls of their ship while you are docked — or while you are merely near. Their ship does not vanish from your screen: you are both in the same stretch of space, each with your own stick, and the server tells both screens where both ships are. Two pilots who are both there are solid to each other whatever their ships are marked; the latches only catch if at least one of the two ships is OPEN. |
| The map | Two ships, as before, moving as one. A ship another player is flying right now reads IN FLIGHT: from further than ten kilometres the map shows where it last settled; inside ten kilometres you share a stretch of space, and the map, the target chip and the flight all show it where it really is. A ship its owner has not opened is on nobody else's map at all: it appears only once you come within about ten kilometres of it, and vanishes again as you leave. |
| Who keeps it | The world does. While you are joined the status chip reads ROOM: the server flies the pair move for move, corrects your screen to it a little and often, and is the one that writes where both ships are — your phone's word alone is never taken for a ship somebody else is holding on to. |
| Letting go | Undock on your own ring (theirs is theirs to open). The ring springs the two apart, the lighter one leaving faster, and each flies on exactly as the ship it always was. |
Rarely the world does not see a docking — the link dropped at the wrong moment. The flight then says The server did not follow this docking and the two ships are simply apart again, where they were. Fly in and dock again.
Opening a station to visitors is an act of trust: a visitor's engine moves your station while they are docked, and yours moves them. Neither of you can take anything that belongs to the other without the owner sharing it, and at the owner's price. A station with several rings can hold several visitors at once, each joined the same way. Two ships of your own still dock the old way, and become one ship.
What makes the latches catch
Docking needs a Docking Port on each ship: a port's face takes another port and no other part. (A ship with no port can still be caught with a claw — see Grabbing with a claw.) It does not need a target: marking one is how you find a ship and fly the approach on numbers, not permission to touch it. Any ship or dropped stage of yours in the flight will latch. When two ports meet, the latches close on their own if all five of these hold at once.
| Condition | The Docking Port's limit |
|---|---|
| Close enough | 1.0 m |
| Slow enough | 0.8 m/s |
| Square enough | 40 ° |
| Not turning against each other | 0.25 rad/s |
| Coming together, not drifting apart | — |
The two faces have to be pointing into each other, not merely near each other, and the ships have to be turning together rather than against each other. The last condition is what lets a joint be cut at all: a pair that has just been pushed apart by an undock is still inside every other limit, so a pair that is opening never latches, however slowly it opens. And two rings that have just let go do not catch each other again until they have been farther apart than their capture range, so a ship undocked from a lander it stood on can settle back onto it without latching. Where the two ports differ, the tighter of the two figures is what the joint is held to. The latches do not catch while time is warped, so fly the last stretch at normal speed.
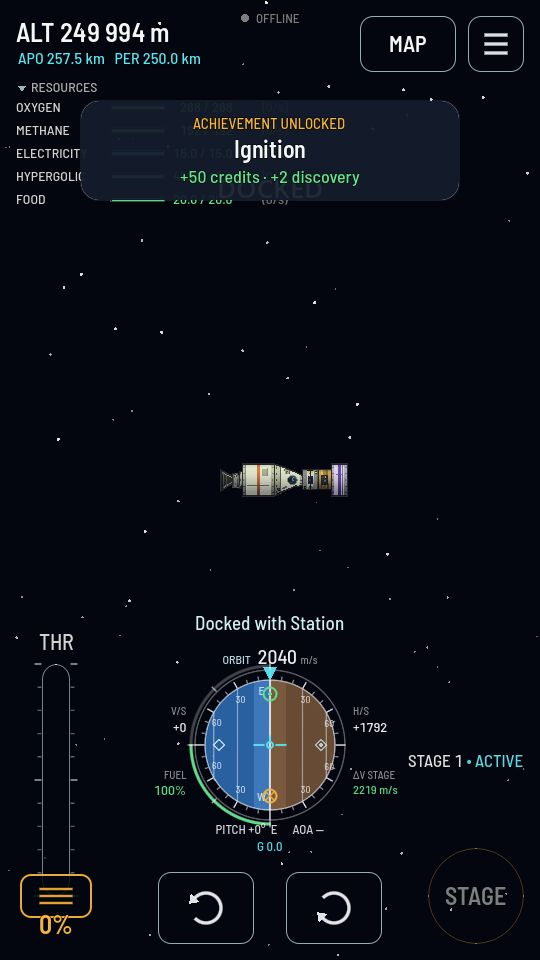
When they catch, the flight says "Docked with" and the other ship's name, and there is one ship where there were two. Its parts are yours now, its tanks appear in your resource list, its thrusters answer your controls, and its card is gone from the map. Every resource crosses the joint, fuel and hypergolic propellant included, which is what makes a tanker useful: dock one to a ship in orbit and its propellant is simply part of the ship.
Grabbing with a claw
A Grappling Claw joins two ships without a port on the far side. Its jaws close on the outside of any part of the other ship — a spent stage with no ring, a derelict, a station whose ports are all taken — under the same four conditions a port has, measured from the jaws to the nearest side of that part. Only the claw has limits here, since the part it bites has no latches of its own.
| Condition | The Grappling Claw's limit |
|---|---|
| Close enough | 1 m |
| Slow enough | 1 m/s |
| Square enough to that side | 35 ° |
| Not turning against each other | 0.3 rad/s |
| Coming together, not drifting apart | — |
When they bite, the flight says "Grabbed" and the other ship's name, the banner reads GRAPPLED, and the ship you caught is turned square onto the jaws and becomes part of yours, exactly as a docked ship does. Only the ship you are flying grabs: a claw on a ship you are not flying stays open. And a claw takes hold only of your own ships and dropped stages: on another player's ship the jaws stay open, even an OPEN one — join one of theirs with a Docking Port. A claw whose Armed switch is off grabs nothing at all.
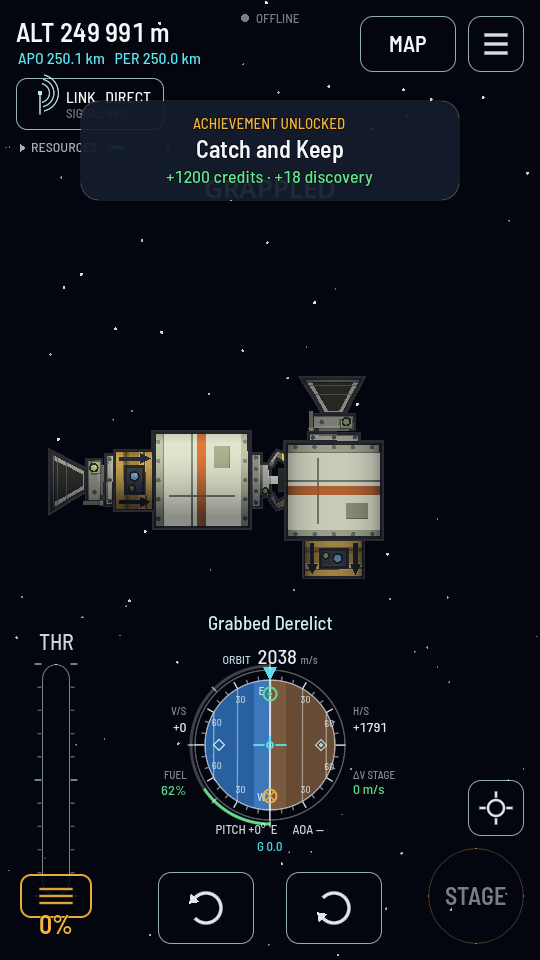
What crosses the grip depends on what was grabbed. The jaws carry whatever the held part itself carries: a fuel tank's oxygen and methane, but through a pod or a probe core only charge, food, waste and hypergolic propellant. So grab the tank, not the capsule on top of it, when it is the propellant you are after, and mount the claw straight on a tank of your own. Transfer resources lists the caught ship as a ship of its own, the same as a docked one.
The claw's sheet offers Release, and a stage can do it too: the jaws open and the two ships are pushed gently apart, the caught one flying on as a piece of its own.
Which ship the pair becomes
Two ships that dock become one, and that one has to have a name and a place in your fleet. Normally it is the ship you were flying: it keeps its name and its place, and the ship you caught stops existing separately.
A space station is the exception, and it is a switch you throw yourself. Every command pod and probe core carries a Space station toggle on its sheet, in the hangar and in flight alike. Turn it on and that ship absorbs whatever docks with it instead: the pair keeps the station's name and the station's place in your fleet, and it is the visiting ship that stops existing. Fly a station into another station and the switches cancel out — the ship you are flying wins, because you flew it there on purpose.
Either way, nobody takes the controls away from you. You go on flying from the pod you flew the approach in; the station's own pod is simply another module aboard until you choose it.
Choosing it is the other switch. With more than one command pod on a ship, Control from here says which one you are flying from. It decides who steers, whose astronaut is the pilot the ship is judged on, which pod has to have an astronaut in it before the ship may launch at all — the others are cabins — and, when you undock, which half you stay with. Only one pod holds it at a time: turn it on somewhere else and it moves. If you never touch it, the first command pod on the ship has it.
The pod you control from also carries Inverted controls. Turn it on when that pod faces the wrong way for the flying you are about to do — a capsule that has to back its tail into a docking ring, say. The pod’s tail becomes the ship’s nose: the navball, prograde and retrograde, and the MOVE and DOCK pads all read the ship pointing tail first, while the turn buttons still turn the ship the way they always did. The switch on any other pod aboard does nothing until you control from it.
A ship's name follows the same pair of switches. It is stored on one pod, not on the ship: the station's pod when the ship is a station, otherwise the pod you are controlling from. That is why a capsule that undocks from a station flies away under its own name and leaves the station under the station's, instead of two ships answering to the same one.
Coming apart again
A joint you made can be undone. The Docking Port's own sheet offers Undock, and a stage can be set to do the same. Either way the joint is cut and the two halves are pushed gently apart. You stay with the half your Control from here pod is in; the other half carries on as a piece of its own and goes back into the world as its own ship once it is coasting. See Debris and dropped stages.
Two ports can also be joined in the hangar. That is how you build a ship with a joint it is meant to shed: a lander bolted to a transfer stage, undocked when it is time to go down.
While the joint holds, the pair is one ship in every respect — including its crew. Both halves' pods and cabins are on one list, so a Meek can be walked from one into the other before you cut it: Transfer crew between modules. Whoever is in the far half when the latches let go goes with it.
The same goes for what the two ships carry. Any store's sheet offers Transfer resources, and the other ship's tanks, batteries and larders are on its list: a tanker's oxygen and methane pumped into a station's tanks, a lander's batteries topped up from its orbiter, a capsule's waste handed to a hold. Fuel crosses the ports the way it crosses any joint that carries it; charge, food, waste and hypergolic propellant cross everything. Steps are in Transfer resources between stores — and, like the crew, move the load before you undock.
Without a joint at all, an astronaut can still walk across to a ship within 50 m once the two are drifting apart at under 2 m/s: Walk across to another ship.